As our boat-building lifestyle gets back to more of a boat-cruising lifestyle, this seems like a good time to start a cruising blog. We've begun to take Kama Hele out more and put some hours on all the equipment we've been installing to get the boat cruise ready and get everything "dialed in". In the coming year, we plan to do a lot more weekend trips, anchoring out, boat handling practice for Sue, and maybe a trip down to the Channel Islands in the late Summer. All this stuff will be on our cruising blog at:
kamahelecruising.blogspot.com
I'll still post boat projects here (there's always something I'm working on), but please check out the new blog to see the boat doing what she is designed to do.
Saturday, November 25, 2017
Wednesday, October 11, 2017
Putting things back together.
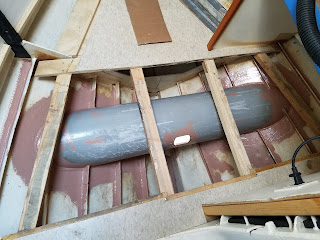
Next couple of weeks after the haulout were spent cleaning and putting everything back together inside the boat. The forepeak deck had to be rebuilt, with a bigger hatch to access the bow thruster hydraulic equipment:
Went with the same industrial tile flooring in the forpeak as before- it seems to hold up pretty well.
Boxed in some ballast:
The Haul-out
So its been a little over two years since our last haulout.
No real surprises coming out of the water. We lost a little paint around the anodes (we are slightly over-protected with zincs), and the prop had quite a bit of calcified growth, and a nice colony of mussels on the keel cooler. We designed a big margin on the keel cooler to allow for warmer water and marine growth. Was nice to see that the engine cooling system was still performing great, even with all the growth that we had on the cooler.
No real surprises coming out of the water. We lost a little paint around the anodes (we are slightly over-protected with zincs), and the prop had quite a bit of calcified growth, and a nice colony of mussels on the keel cooler. We designed a big margin on the keel cooler to allow for warmer water and marine growth. Was nice to see that the engine cooling system was still performing great, even with all the growth that we had on the cooler.
We got right to work installing the thruster tube. The bow thruster tube is a section of 12" schedule 40 steel pipe, about 3/8" wall thickness. Plenty strong. Here's some of the work cutting in the holes for the pipe.
Once the fit-up was good, the tube was scribed and cut to match the hull plating. We added doubler plates and a couple of bolt on steel bars on each side of the tunnel to keep big debris out of the tunnel.
The controller went right between the tiller and the engine controls. It looks a little tight in the pics, but is very ergonomic, and allows for easy control of the rudder and bow thruster with one hand.
A great tool for this kind of work:
The cat wasn't much help:
I spent the second weekend at the shipyard cleaning and painting the inside of the forepeak, then installing the gear leg (the part that connects the motor to the counter-rotating props), and hooking everything up: hoses, wiring, directional control valve, gear oil reservoir, etc.
The finished product:
I got my hands on a "corrosion meter", which measures the effectiveness of the zinc anodes protecting the hull, and tells you if all the underwater metals are properly protected by the anodes.
Required a 1/2" hole in the hull for the reference anode and a couple of wires to hook up:
Decided to try Propspeed coating on the propeller to cut down on some of the growth between haulouts. Also added a nasty looking serrated line cutter to the shaft:
Back in the water:
The bow thruster worked right out of the travel lift- no issues, plenty of power, and a huge improvement in close-quarters maneuverability.
Subscribe to:
Comments (Atom)


